
HomeGrown Solution: Unexpected Encounters with Body Decorations
Title
Submitted By
HomeGrown Solution Number
Identification of the Problem
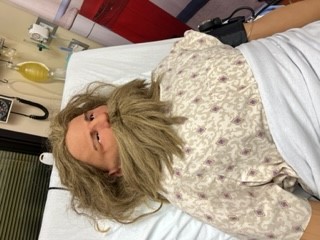
Non-traditional jewelry, accessories, or body hair on patients can be surprising for students, which can lead to a noticeable change in care for the patient.
Unique Idea
Objectives
The objective is to improve the students' knowledge base, confidence, and care to patients with tattoos, piercings, different hair colors, and a long beard.
Supplies/Ingredients
- Rub-on temporary tattoos
- Wearable tattoo sleeve
- Body jewelry
- Body chains
- Various wigs for hair and face
- Permanent marker
- Food plastic wrap
- Water
- Cloth
- Optional: needle, straight pin, paperclip
Steps to Creating the Solution
Tattoo Steps
- General temporary tattoos:
- Remove the protective film from the temporary tattoo.
- Soak the back of the temporary tattoo with a warm cloth.
- Affix the tattoo to the desired location on the manikin. Additional directions to place the temporary tattoos are typically on the back side of the tattoo.
- Wearable sleeve tattoos:
- Slip the wearable sleeve tattoo on the manikin's arm.
- Temporary penis tattoos:
- Write a word on a piece of food plastic wrap with a permanent marker.
- Bunch the food plastic wrap in an accordion type fashion until the word is the same length as the manikin's penis.
- Roll the top of the penis on the food plastic wrap to cause the ink transfer. Any area that doesn't transfer well can be traced over with the permanent marker.
- Temporary tattoo removal:
- Rubbing alcohol should remove the temporary tattoo. Acne cream is also successful for removal of residual ink (apply and leave on until the ink has disappeared); may need to repeat.
Piercing Steps
- To pierce a manikin, chose your desired location then use a needle, straight pin, paperclip, or simply the jewelry to poke the object through the skin. If something other than the jewelry is used, pull it and place the jewelry in the newly created hole.
- Attach the body chains according to the instructions on the package provided or in a manner to obtain the desired location.
Wig Steps
- Wigs are placed on the manikin heads and faces according to manufacturer instructions.
Images


Video
HomeGrown Disclaimer
The information contained within this website is for information purposes only. While the website is monitored in an attempt to keep the information up to date and accurate, be aware that there are no representations or warranties of any kind, express or implied, about the completeness, accuracy, reliability, and/or suitability being made. The sponsors of this website are not liable for any loss or damage that may result from using information contained within this website. Any reliance you place on the information contained within this website is strictly at your own risk.
Please note that sections of this website include postings of individuals not associated with the website sponsors. These postings are not endorsed or warrantied by the website, and use of such information is at your own risk.
Always check the user guide/manuals provided by the manufacturer of your manikin or task trainer. Using products that are not sanctioned may invalidate the product warranty. (For example: Some products could stain the skin on a manikin. Liquids used around electrical parts may cause malfunctions.)